【webpack】:基础及高级配置
# Webpack 基本配置
下面例子涉及的内容:
拆分配置及 merge
启动本地服务
处理 ES6
处理样式
处理图片
例子:
webpack.common.js 公共配置
module.exports = {
    entry: `./src/index.js` // 入口文件
    module: {
      rules: [
        {   // 编译 ES6
            test: /\.js$/, // 验证规则
            loader: ['babel-loader'],
            include: './src' // 需要编译的路径
            exclude: /node_modules/ // 不需要编译的路径
        },
        {   // 编译 css
            test: /\.css$/,
            // loader 的执行顺序是: 从后往前
            loader: ['style-loader', 'css-loader']
        },
        {
            // css兼容处理
            test: /\.css$/,
            loader: ['style-loader', 'css-loader', 'postcss-loader']
        },
        {
            // 编译 less (scss 同理)
            test: /\.less$/,
            loader: ['style-loader', 'css-loader', 'less-loader']
        }
      ]
    },
    plugins:[
        new HtmlWebpackPlugin({
            template: './src/index.html',
            filename: 'index.html'
        })
    ]
}
1
2
3
4
5
6
7
8
9
10
11
12
13
14
15
16
17
18
19
20
21
22
23
24
25
26
27
28
29
30
31
32
33
341、编译 ES6 是使用 babel,可以在项目的根目录下创建
.babelrc文件,配置编译规则{ "presets": ["@babel/preset-env"], "plugins": [] }1
2
3
4@babel/preset-env:包含了常用的 ES6,ES7,ES8 常用的语法2、
postcss-loader:配置浏览器 css 兼容性。使用时需要在项目根路径下创建postcss.config.jsmodule.exports = { // 增加从 postcss-loader 插件集合中引入添加css前缀插件 plugins: [require("autoprefixer")], };1
2
3
4需要安装
autoprefixer、postcss-loader
webpack.dev.js 开发配置
const webpackCommonConf = require('./webpack.common.js');
const { smart } = require('webpack-merge');
const webpack = require('webpack');
module.exports = smart(webpackCommonConf, {
   mode: 'development',
   module: {
       rules: [
           {
               // 开发环境下图片处理:直接引入 图片 url
               test: /\.(png|jpg|jpeg|gif)$/,
               use: 'file-loader'
           }
       ]
   },
   plugins: [
       new Webpack.DefinePlugin({
           // 配置 window.ENV = 'development'
           ENV: JSON.stringify('development')
       })
   ],
   devServer: {
       port: 8080,
       progress: true, // 显示打包的进度
       contentBase: './dist', // 项目根路径
       open: true, // 自动打开浏览器
       compress: true // 自动 gzip 压缩
   }
   proxy: {
     // 将本地 /api/xxx 代理到 localhost:3000/api/xxx
    '/api': 'http://localhost:3000',
     // 将本地 /api2/xxx 代理到 localhost:3000/xxx
    '/api2': {
       target: 'http://localhost:3000',
       pathRewrite: {
           '/api2': ''
       }
     }
   }
});
1
2
3
4
5
6
7
8
9
10
11
12
13
14
15
16
17
18
19
20
21
22
23
24
25
26
27
28
29
30
31
32
33
34
35
36
37
38
391、开发环境下启动命令(需要下载 webpack-dev-server)
"dev": "webpack-dev-server --config build-base-conf/webpack.dev.js",12、处理图片:开发环境下使用 url,如果在线上环境下使用 url,对性能方面是比较不友好的
webpack.prod.js 生产配置(线上)
const webpackCommonConf = require('./webpack.common.js');
const { smart } = require('webpack-merge');
module.exports = smart(webpackCommonConf, {
    mode: 'production',
    output: {
        filename: 'bundle.[contentHash:8].js', // 打包代码时,加上 hash 戳
        path: './dist'
    }
    module: {
        rules: [
            {
                //  生产环境下图片处理:将比较小的图片地址设置为base64
                test: /\.(png|jpg|jpeg|gif)$/,
                use: {
                    loader: 'url-loader',
                    options: {
                        // 小于 5kb 的图片用 base64 格式产出
                        // 否则,依然延用 file-loader 的形式,产出 url 格式
                        limit: 5 * 1024,
                        outputPath: '/img1', // 图片打包到 img1 目录下
                    }
                }
            }
        ]
    },
    plugins: [
        {
            new ClearWebpackPlugin(), // 会默认清除 output.path 文件夹
            new Webpack.DefinePlugin({
                 // window.ENV = 'production'
                 ENV: JSON.stringify('production')
            })
        }
    ]
})
1
2
3
4
5
6
7
8
9
10
11
12
13
14
15
16
17
18
19
20
21
22
23
24
25
26
27
28
29
30
31
32
33
34
351、生产环境下启动命令
"build": "webpack --config build-base-conf/webpack.prod.js"12、生产环境下将小图片转成 base64 的好处
- 减少 http 请求
- 性能优化
3、打包代码时,加上 hash 戳的好处
- 什么是 hash 戳:根据内容去生产对应的 8 位字符串。只要内容变了,生产的字符串也会进行变化。
- 当内容没有变化时,访问页面,请求 js 文件时,会命中缓存,提高访问速度
测试代码:code/1
# Webpack 高级配置
# 多入口文件
webpack.common.js
const HtmlWebpackPlugin = require("html-webpack-plugin");
module.exports = {
  entry: {
    // 入口文件
    index: "./src/index.js",
    other: "./src/other.js",
  },
  module: {
    rules: [],
  },
  plugins: [
    // 多入口 - 生成 index.html
    new HtmlWebpackPlugin({
      template: "./src/index.html",
      filename: "index.html",
      // chunks 表示该页面要引用哪些 chunk (即上面的 index 和 other),默认全部引用
      chunks: ["index"], // 只引用 index.js
    }),
    // 多入口 - 生成 other.html
    new HtmlWebpackPlugin({
      template: "./src/other.html",
      filename: "other.html",
      chunks: ["other"], // 只引用 other.js
    }),
  ],
};
1
2
3
4
5
6
7
8
9
10
11
12
13
14
15
16
17
18
19
20
21
22
23
24
25
26- webpack.prod.js
const webpackCommonConf = require("./webpack.common.js");
const { smart } = require("webpack-merge");
module.exports = smart(webpackCommonConf, {
  mode: "production",
  output: {
    // 输出: name 对应 entry index 及 other
    filename: "[name].[contentHash:8].js",
    path: "./dist",
  },
});
1
2
3
4
5
6
7
8
9
10
# 抽离 CSS 文件
背景:按照 webpack 的基本配置案例中,执行命令npm run dev
在入口文件引入 css 文件:

打包生成后:包含 css
 最终在页面中:css 会显示在
style标签中
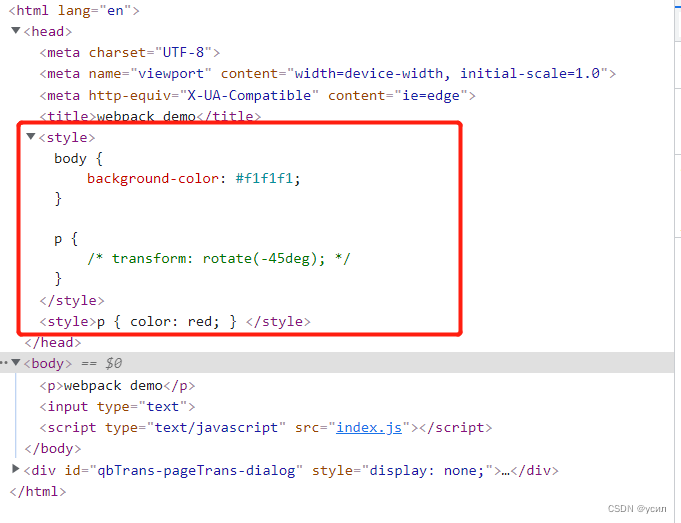
同理执行命令npm run build 也会出现上述情况
测试代码:code/1
对于开发环境下,问题不是很大。
但在线上环境下这种方式是不友好的,正确的做法是:将 css 抽离出来进行打包压缩体积,再已外链的形式引入
由于是针对线上环境:故在webpack.prod.js进行配置
webpack.prod.js
const webpack = require("webpack");
const { smart } = require("webpack-merge");
const { CleanWebpackPlugin } = require("clean-webpack-plugin");
const MiniCssExtractPlugin = require("mini-css-extract-plugin");
const TerserJSPlugin = require("terser-webpack-plugin");
const OptimizeCSSAssetsPlugin = require("optimize-css-assets-webpack-plugin");
const webpackCommonConf = require("./webpack.common.js");

module.exports = smart(webpackCommonConf, {
  mode: "production",
  output: {
    filename: "bundle.[contentHash:8].js", // 打包代码时,加上 hash 戳
    path: "./dist",
  },
  module: {
    rules: [
      // 抽离 css
      {
        test: /\.css$/,
        loader: [
          MiniCssExtractPlugin.loader, // 注意,这里不再用 style-loader
          "css-loader",
          "postcss-loader",
        ],
      },
      // 抽离 less --> css
      {
        test: /\.less$/,
        loader: [
          MiniCssExtractPlugin.loader, // 注意,这里不再用 style-loader
          "css-loader",
          "less-loader",
          "postcss-loader",
        ],
      },
    ],
  },
  plugins: [
    // 抽离 css 文件
    new MiniCssExtractPlugin({
      filename: "css/main.[contentHash:8].css",
    }),
  ],

  optimization: {
    // 压缩 css
    minimizer: [new TerserJSPlugin({}), new OptimizeCSSAssetsPlugin({})],
  },
});
1
2
3
4
5
6
7
8
9
10
11
12
13
14
15
16
17
18
19
20
21
22
23
24
25
26
27
28
29
30
31
32
33
34
35
36
37
38
39
40
41
42
43
44
45
46
47
48
49npm run build
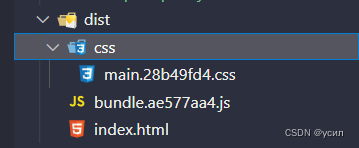

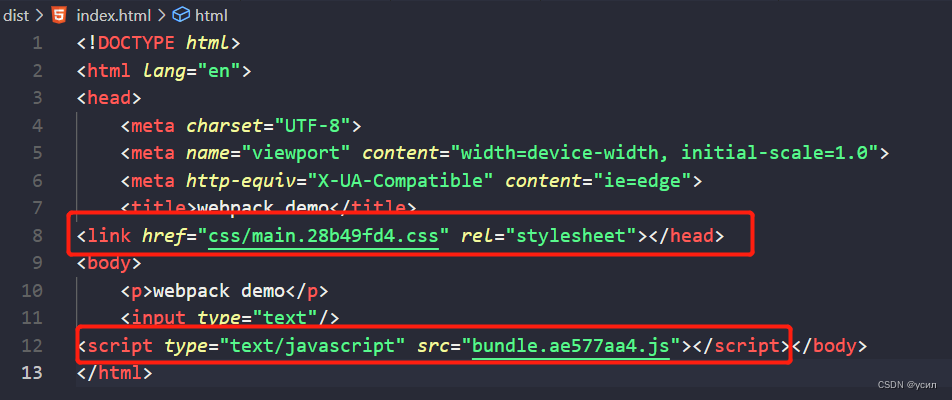
测试代码:code/2
# 抽离公共代码
背景:在多个文件中我们可能会引用同一份代码。比如下面的例子
在入口文件 index.js中引入了math.js文件
import { sum } from "./math";
const sumRes = sum(10, 20);
console.log("sumRes", sumRes);

console.log("index.js");
2
3
4
5
同样在 other.js中也引入 main.js文件
import { sum } from "./math";
const sumRes = sum(10, 20);
console.log("sumRes", sumRes);

console.log("other.js");
2
3
4
5
这样正常打包完成后,就会出现在index.js以及other.js都同时包含了 math 中的代码。
// index.js
const sum = (a, b) => a + b;
const sumRes = sum(10, 20);
console.log("sumRes", sumRes);
console.log("index.js");

// other.js
const sum = (a, b) => a + b;
const sumRes = sum(10, 20);
console.log("sumRes", sumRes);
console.log("other.js");
2
3
4
5
6
7
8
9
10
11
在实际开发环境下问题不是很大,但在线上环境下,如果main.js文件很大的情况下,就会造成文件过大。
正确的做法是:在生产环境下打包,我们应该把公共代码抽离成一个文件,使用是直接使用外链引入即可。
下面以打包两个入口文件为例:
- webpack.common.js
const HtmlWebpackPlugin = require("html-webpack-plugin");
module.exports = {
  entry: {
    index: "./src/index.js",
    other: "./src/other.js",
  },
  module: {},
  plugins: [
    new HtmlWebpackPlugin({
      template: "./src/index.html",
      filename: "index.html",
      // index: 对应 entry 字段 index
      // vendor,common: 对应分割代码中的 chunk 分组
      chunks: ["index", "vendor", "common"],
    }),
    new HtmlWebpackPlugin({
      template: "./src/index.html",
      filename: "other.html",
      chunks: ["other", "vendor", "common"],
    }),
  ],
};
2
3
4
5
6
7
8
9
10
11
12
13
14
15
16
17
18
19
20
21
22
- webpack.drod.js
const webpackCommonConf = require('./webpack.common.js')
const { smart } = require('webpack-merge')
module.exports = smart(webpackCommonConf, {
    mode: 'production',
    output: {
        filename: '[name].[contentHash:8].js',
        path: './dist'
    },
    module: {},
    plugins: [
        splitChunks: {
           chunks: 'all',
           cacheGroups: {
               // 第三方包
               vendor: {
                  // chunk 名称
                  name: 'vendor',
                  // 优先级 (权限越高,优先抽离)
                  priority: 1,
                  test: /node_modules/,
                  minSize: 0, // 当包大小超过该值100kb时,就抽离出来
                  minChunks: 1, // 当包被引用次数超过1次,就抽离出来
               },
               common: {
                    name: 'common',
                    priority: 0,
                    minSize: 0,
                    minChunks: 2
               }
           }
        }
    ]
})
2
3
4
5
6
7
8
9
10
11
12
13
14
15
16
17
18
19
20
21
22
23
24
25
26
27
28
29
30
31
32
33
上述例子是基于 webpack4.0 版本的,在 webpack5.0 中, 无需配置
chunks: ['other', 'vendor', 'common'],会根据入口文件中引入什么模块就自动引入,就算配置了chunks: ['other', 'vendor', 'common'],也不会生效。
# 懒加载
// index.js
setTimeout(() => {
  // 会单独产生一个 chunks
  import("./dynamic-data.js").then((res) => {
    console.log(res.defult.message);
  });
}, 1500);
2
3
4
5
6
7
export default {
  message: "this is dynamic data",
};
2
3
webpack 默认支持的语法
# 加载 vue、react
加载 react
// npm install --save-dev @babel/preset-react

// .babelrc
{
    "presets": ["@babel/preset-react"],
    "plugins": []
}
1
2
3
4
5
6
7加载 vue
// 下载 vue-loader
module.exports = {
  module: {
    rules: [
      {
        test: /\.vue$/,
        loader: ["vue-loader"],
        include: "./src",
      },
    ],
  },
};
1
2
3
4
5
6
7
8
9
10
11
12