vue2 笔记
# watch 与 computed 的区别
1、computed 基本使用
<template>
  <div>
    <p>num {{ num }}</p>
    <p>double1 {{ double1 }}</p>
    <input v-model="double2" />
  </div>
</template>
<script>
export default {
  data() {
    return {
      num: 20,
    };
  },
  computed: {
    double1() {
      return this.num * 2;
    },
    double2: {
      // 获取值
      get() {
        return this.num * 2;
      },
      // 设置值
      set(val) {
        this.num = val / 2;
      },
    },
  },
};
</script>
2
3
4
5
6
7
8
9
10
11
12
13
14
15
16
17
18
19
20
21
22
23
24
25
26
27
28
29
30
31
2、watch 基本使用
<template>
  <div>
    <input v-model="name" />
    <input v-model="info.city" />
  </div>
</template>

<script>
export default {
    data() {
        return {
            name: '浩浩',
            info: {
                city: '汕头'
            }
        }
    },
    watch: {
        name(oldVal, val) {
            // 值类型,可正常拿到 oldVal 和 val
            console.log('watch name', oldVal, val)
        },
        info: {
            handler(oldVal, val) {
                // 引用类型,拿不到 oldVal 。因为指针相同,此时已经指向了新的 val
                console.log('watch info', oldVal, val)
            },
            deep: true // 深度监听
            immediate: true // 初始化时立即执行
        }
    }
}
</script>
2
3
4
5
6
7
8
9
10
11
12
13
14
15
16
17
18
19
20
21
22
23
24
25
26
27
28
29
30
31
32
33
3、区别
computed:
- 支持缓存,只有依赖的数据发生变化,才会重新计算
- 不支持异步,当 computed 内存在异步操作时,无法监听数据的变化
- 如果属性依赖于其他属性(一对多,一对一),一般使用 computed
- computed 中,属性中都有get 和 set 方法
- 监听的属性来自于 data 中声明过或者父组件传递的 props 中的数据
watch:
- 不支持缓存,数据发生变化时,直接回触发相应操作
- 支持异步
- 监听的函数接收俩个参数(之前的值,最新值)
- watch 两个属性值
- immediate:组件加载立即触发回调函数执行
- deep: 深度监听 为了发现对象内部值的变化,复杂类型的数据时使用,例如数组中的对象内容的改变
- deep 无法监听到数组的变动和对象的新增,参考 vue 数组变异,只有以响应式的方式触发才会被监听到
已上面为例子,如何单纯监听 info 中 age 的变化
<template>
  <div>
    <input v-model="info.age" />
  </div>
</template>

<script>
export default {
  data() {
    return {
      name: "浩浩",
      info: {
        city: "汕头",
        age: "12",
      },
    };
  },
  watch: {
    "info.age": function (oldVal, val) {
      console.log("watch info", oldVal, val);
    },
  },
};
</script>
2
3
4
5
6
7
8
9
10
11
12
13
14
15
16
17
18
19
20
21
22
23
24
# 事件绑定
1、基本使用
<template>
  <div>
    <p>{{ num }}</p>
    <button @click="increment1">+1</button>
    <button @click="increment2(2, $event)">+2</button>
  </div>
</template>

<script>
export default {
  data() {
    return {
      num: 0,
    };
  },
  methods: {
    increment1(event) {
      // 是原生的 event 对象
      console.log("event", event, event.__proto__.constructor);
      // 事件是被注册到当前元素的
      console.log(event.currentTarget);
      this.num++;
    },
    increment2(val, event) {
      console.log(event.target);
      this.num = this.num + val;
    },
    loadHandler() {},
  },
  mounted() {
    // 自定义挂载事件
    window.addEventListener("load", this.loadHandler);
  },
  beforeDestroy() {
    window.removeEventListener("load", this.loadHandler);
  },
};
</script>
2
3
4
5
6
7
8
9
10
11
12
13
14
15
16
17
18
19
20
21
22
23
24
25
26
27
28
29
30
31
32
33
34
35
36
37
38
2、注意
- 使用 vue 的方式绑定事件时,传递 event 事件对象是原生事件对象,事件时被挂载到当前对象中(跟 DOM 事件一致)
- 使用自定义绑定事件时,在组件销毁前需要对事件进行销毁
- 使用 vue 的方式绑定事件时,组件销毁时会自动被解绑
# 样式绑定
1、基本使用
<template>
  <div>
    <p :class="{ black: isBlack, yellow: isYellow }">使用 class</p>
    <p :class="[black, yellow]">使用 class (数组)</p>
    <p :style="styleData">使用 style</p>
  </div>
</template>

<script>
export default {
  data() {
    return {
      isBlack: true,
      isYellow: true,

      black: "black",
      yellow: "yellow",

      styleData: {
        fontSize: "40px", // 转换为驼峰式
        color: "red",
        backgroundColor: "#ccc", // 转换为驼峰式
      },
    };
  },
};
</script>

<style scoped>
.black {
  background-color: #999;
}
.yellow {
  color: yellow;
}
</style>
2
3
4
5
6
7
8
9
10
11
12
13
14
15
16
17
18
19
20
21
22
23
24
25
26
27
28
29
30
31
32
33
34
35
36
# v-show 和 v-if 的区别
1、基本使用
<template>
  <div>
    <p v-if="type === 'a'">A</p>
    <p v-else-if="type === 'b'">B</p>
    <p v-else>other</p>

    <p v-show="type === 'a'">A by v-show</p>
    <p v-show="type === 'b'">B by v-show</p>
  </div>
</template>

<script>
export default {
  data() {
    return {
      type: "a",
    };
  },
};
</script>
2
3
4
5
6
7
8
9
10
11
12
13
14
15
16
17
18
19
20
2、注意
从原理看:
v-if:动态创建和销毁(即声明周期会重新执行一遍)
v-show:纯 CSS 样式的显示和隐藏(即声明周期不会重新执行一遍)
从性能看:
v-if:需要更高的切换开销
v-show:性能好
# 表单如何绑定变量
1、基本使用
<template>
  <div>
    <p>输入框: {{ name }}</p>
    <input type="text" v-model.trim="name" />
    <input type="text" v-model.lazy="name" />
    <input type="text" v-model.number="age" />

    <p>多行文本(值): {{ desc }}</p>
    <textarea v-model="desc"></textarea>

    <p>复选框(布尔值) {{ checked }}</p>
    <input type="checkbox" v-model="checked" />

    <p>多个复选框 (数组){{ checkedNames }}</p>
    <input type="checkbox" id="jack" value="Jack" v-model="checkedNames" />
    <label for="jack">Jack</label>
    <input type="checkbox" id="john" value="John" v-model="checkedNames" />
    <label for="john">John</label>
    <input type="checkbox" id="mike" value="Mike" v-model="checkedNames" />
    <label for="mike">Mike</label>

    <p>单选(值) {{ gender }}</p>
    <input type="radio" id="male" value="male" v-model="gender" />
    <label for="male">男</label>
    <input type="radio" id="female" value="female" v-model="gender" />
    <label for="female">女</label>

    <p>下拉列表选择 (值){{ selected }}</p>
    <select v-model="selected">
      <option disabled value="">请选择</option>
      <option>A</option>
      <option>B</option>
      <option>C</option>
    </select>

    <p>下拉列表选择(多选)(数组) {{ selectedList }}</p>
    <select v-model="selectedList" multiple>
      <option disabled value="">请选择</option>
      <option>A</option>
      <option>B</option>
      <option>C</option>
    </select>
  </div>
</template>

<script>
export default {
  data() {
    return {
      name: "浩浩",
      age: 18,
      desc: "自我介绍",

      checked: true,
      checkedNames: [],

      gender: "male",

      selected: "",
      selectedList: [],
    };
  },
};
</script>
2
3
4
5
6
7
8
9
10
11
12
13
14
15
16
17
18
19
20
21
22
23
24
25
26
27
28
29
30
31
32
33
34
35
36
37
38
39
40
41
42
43
44
45
46
47
48
49
50
51
52
53
54
55
56
57
58
59
60
61
62
63
64
# 遍历数组及对象
1、基本使用
<template>
  <div>
    <p>遍历数组</p>
    <ul>
      <li v-for="(item, index) in listArr" :key="item.id">
        {{ index }} - {{ item.id }} - {{ item.title }}
      </li>
    </ul>

    <p>遍历对象</p>
    <ul>
      <!-- key 代表 a , b , c -->
      <li v-for="(val, key, index) in listObj" :key="key">
        {{ index }} - {{ key }} - {{ val.title }}
      </li>
    </ul>
  </div>
</template>

<script>
export default {
  data() {
    return {
      flag: false,
      listArr: [
        // 数据结构中,最好有 id ,方便使用 key
        { id: "a", title: "标题1" },
        { id: "b", title: "标题2" },
        { id: "c", title: "标题3" },
      ],
      listObj: {
        a: { title: "标题1" },
        b: { title: "标题2" },
        c: { title: "标题3" },
      },
    };
  },
};
</script>
2
3
4
5
6
7
8
9
10
11
12
13
14
15
16
17
18
19
20
21
22
23
24
25
26
27
28
29
30
31
32
33
34
35
36
37
38
39
# 组件生命周期
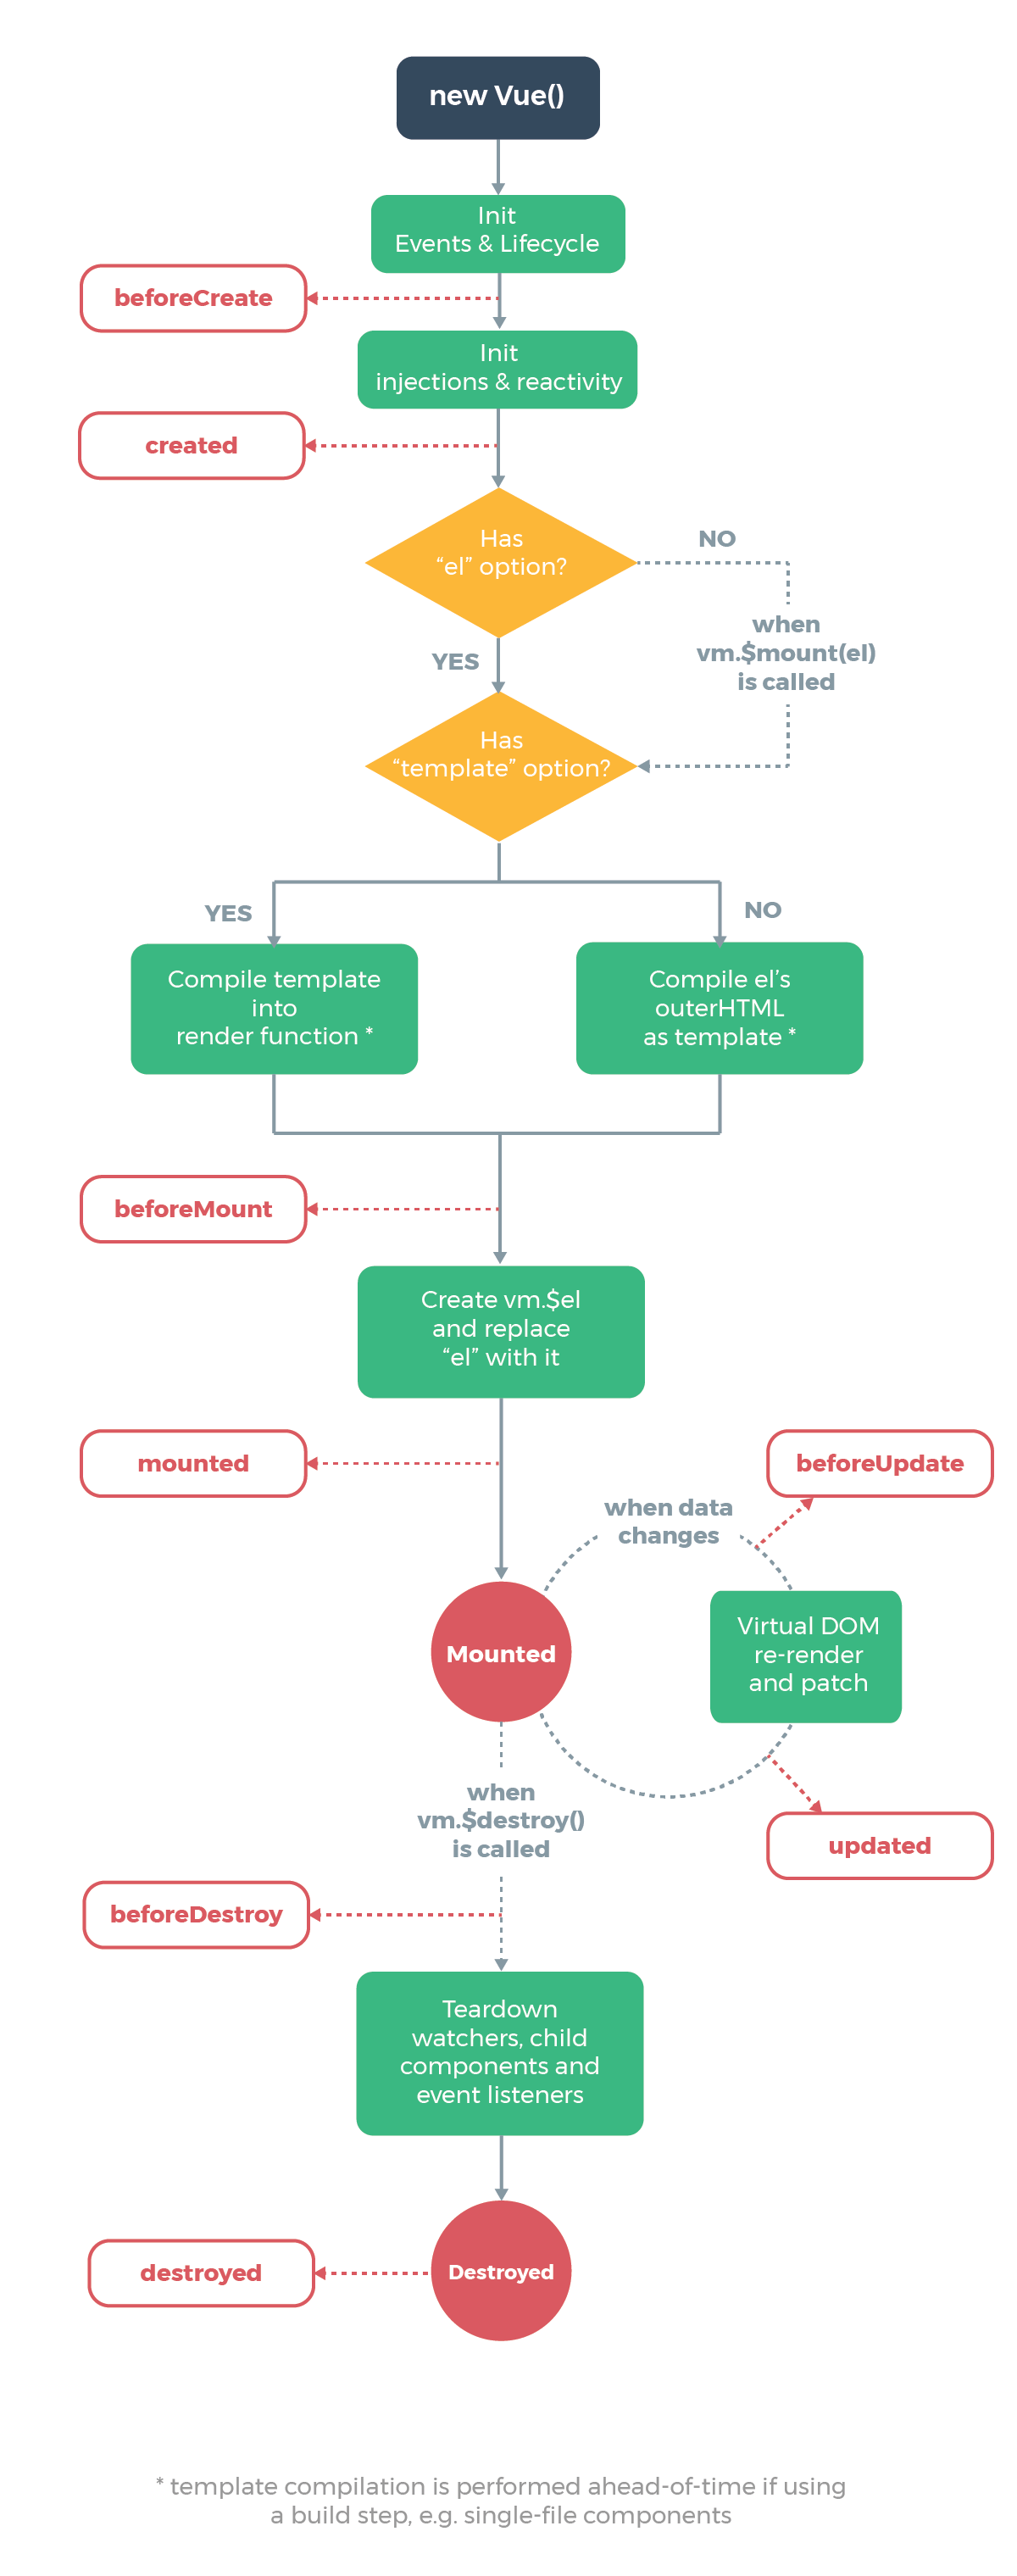
1、创建前 beforeCreate:data 和 methods 中的数据都还没有初始化
2、创建后 created:data 和 methods 中的数据都初始化完毕(可以最早操作 data 或 method 中数据的钩子函数)
3、挂载前 beforeMouted:页面模板已经在内存中编译好,但尚未挂载到页面中(此时页面还是旧的)
4、挂载后 mouted:此时页面和内存中都是最新的数据(可以最早操作 DOM 的钩子函数)
5、更新前 beforeUpdate:此时页面中显示的数据是旧的,但 data 是新的(页面和数据没有进行同步过)
6、更新后 updated: 此时页面显示数据和最新的 data 数据进行同步完毕
7、销毁前 beforeDestroy:在该阶段中,组件实例还没有被销毁,data,method 可以进行使用
8、销毁后 destroved:完全被销毁了
其他三个钩子函数
9、activated:出现在当组件被
keep-alive包裹时10、deactivated:出现在当组件被
keep-alive包裹时
如: keep-alive 包裹两个组件:组件 A 和组件 B。
- 当第一次切换到组件 A 时,组件 A 的 created 和 activated 都会被执行。
- 在切换到组件 B,这时组件 A 的 deactivated 会被触发。
- 在切换回组件 A,组件 A 的 activated 会被触发,但是它的 created 不会被触发了
- 11、errorCaptured:每当事件处理程序或[生命周期钩子抛出错误时,Vue 会调用该钩子
# 多组件生命周期
1、初始化阶段:
创建后(父)=> 创建后(子)=> 挂载后(子)=> 挂载后(父)
2、更新阶段:
更新前(父)=> 更新前(子)=> 更新后(子)=> 更新后(父)
3、销毁阶段:
销毁前(父)=> 销毁前(子)=> 销毁后(子)=> 销毁后(父)
# 组件通信
# 1、父子组件
使用 emit 和 props
例子:todo-list
// 父
<template>
  <div class="container">
    <div>
      <input v-model="inputValue" />
      <button @click="handleClick">提交</button>
    </div>
    <todo-list :data="list" @delete="handleDelete"></todo-list>
  </div>
</template>
<script>
import TodoList from './TodoList/index'
export default {
    components: {
        TodoList
    },
    data() {
        return {
            inputValue: "",
            list: []
        }
    }
    methods: {
       handleClick:function(){
        this.list.push(this.inputValue)
        this.inputValue=""
      },
      handleDelete:function(index){
		this.list.splice(index,1)//删除
	  }
    }
}
</script>
2
3
4
5
6
7
8
9
10
11
12
13
14
15
16
17
18
19
20
21
22
23
24
25
26
27
28
29
30
31
32
33
// TodoList
<template>
  <ul>
    <li v-for="(item, index) in list" :key="index" @click="handleClick(index)">
      {{ item.content }}
    </li>
  </ul>
</template>
<script>
export default {
  props: {
    list: list,
  },
  methods: {
    handleClick(index) {
      // 调用父组件的事件
      this.$emit("delete", index);
    },
  },
};
</script>
2
3
4
5
6
7
8
9
10
11
12
13
14
15
16
17
18
19
20
21
# 2、兄弟组件
使用$emit
// 父
<template>
  <div class="container">
    <component-one />
    <component-two />
  </div>
</template>
2
3
4
5
6
7
// component-one
<template>
  <div class="container"></div>
</template>
<script>
import event from "./evnet";
export default {
    methods: {
      handler(val) {
         console.log("触发", val)
      }
    },
    mounted: {
        // 绑定自定义事件
        event.$on('onAdd', this.handler)
    }
}
</script>
2
3
4
5
6
7
8
9
10
11
12
13
14
15
16
17
18
// component-two
<template>
  <div class="container" @click="clcik"></div>
</template>
<script>
import event from "./evnet";
export default {
    data() {
        return {
            val: "兄弟组件传递的信息"
        }
    }
    methods: {
      clcik() {
          event.$emit('onAdd', this.val)
      }
    }
}
</script>
2
3
4
5
6
7
8
9
10
11
12
13
14
15
16
17
18
19
// .event
import Vue from "vue";
export default new Vue();
2
3
# 父子组件数据的双向绑定
1、基本使用
<template>
  <div>
    <p>{{ name }}</p>
    <Child v-model="name"></Child>
  </div>
</template>
<script>
import Child from "./Child/index";
export default {
  components: {
    Child,
  },
  data() {
    return {
      name: "浩浩",
    };
  },
};
</script>
2
3
4
5
6
7
8
9
10
11
12
13
14
15
16
17
18
19
<template>
  <input
    type="text"
    :value="val"
    @input="$emit('change1', $event.target.val)"
  />
</template>
<script>
export default {
    props: {
        val: String,
        default() {
            return ''
        }
    }

    // 关键代码
    model: {
      prop: 'val',
      event: 'change1'
    }
}
</script>
2
3
4
5
6
7
8
9
10
11
12
13
14
15
16
17
18
19
20
21
22
23
现象:值来源于父组件,值修改在子组件进行修改,值显示在父组件中显示
# nextTick
1、基本使用
<template>
  <div id="app">
    <ul ref="ul1">
      <li v-for="(item, index) in list" :key="index">
        {{ item }}
      </li>
    </ul>
    <button @click="addItem">添加一项</button>
  </div>
</template>

<script>
export default {
  name: "app",
  data() {
    return {
      list: ["a", "b", "c"],
    };
  },
  methods: {
    addItem() {
      this.list.push(`${Date.now()}`);
      this.list.push(`${Date.now()}`);
      this.list.push(`${Date.now()}`);

      // 方式一:
      const ulElem = this.$refs.ul1;
      console.log(ulElem.childNodes.length);

      // 方式二:
      this.$nextTick(() => {
        const ulElem = this.$refs.ul1;
        console.log(ulElem.childNodes.length);
      });
    },
  },
};
</script>
2
3
4
5
6
7
8
9
10
11
12
13
14
15
16
17
18
19
20
21
22
23
24
25
26
27
28
29
30
31
32
33
34
35
36
37
38
2、注意
通过方式一:每次触发 addItem() 事件,获取到的 DOM 是更新前的数据(即数据在没与页面进行同步后就获取该 DOM 对象)
通过方式二:每次触发 addItem() 事件,数据会先与页面进行同步后,再来获取该 DOM 元素
# solt 插槽
1、基本使用
<template>
  <a :href="url">
    <slot> 默认内容,即父组件没设置内容时,这里显示</slot>
  </a>
</template>

<script>
export default {
  props: ["url"],
};
</script>
2
3
4
5
6
7
8
9
10
11
<template>
  <SlotDemo :url="website.url">
    // 若 title 没有传递,则显示子组件(slot)设置的默认内容
    {{ title }}
  </SlotDemo>
</template>
<script>
export default {
  data() {
    return {
      title: "vue高级特性",
    };
  },
};
</script>
2
3
4
5
6
7
8
9
10
11
12
13
14
15
2、作用域插槽
<template>
  <a :href="url">
    <slot :slotData="website">
      {{ website.title }}
    </slot>
  </a>
</template>

<script>
export default {
  props: ["url"],
  data() {
    return {
      website: {
        url: "http://hhmax.xyz",
        title: "个人博客",
      },
    };
  },
};
</script>
2
3
4
5
6
7
8
9
10
11
12
13
14
15
16
17
18
19
20
21
将插槽中的信息传递给调用者,使用 :slotData(自定义变量名),后面跟着要传递的参数
<ScopedSlotDemo :url="website.url">
    <template v-slot="slotProps">
         {{slotProps.slotData.title}}
    </template>
</ScopedSlotDemo>
2
3
4
5
3、具名插槽
<!-- NamedSlot -->
<template>
  <div class="container">
    <header>
      <slot name="header"></slot>
    </header>
    <main>
      <slot></slot>
    </main>
    <footer>
      <slot name="footer"></slot>
    </footer>
  </div>
</template>
2
3
4
5
6
7
8
9
10
11
12
13
14
<NamedSlot>
    <template v-slot:header>
        <h1>头部</h1>
    </template>
    <p>主体内容</p>
    <template #footer>
        <h1>尾部</h1>
    </template>
</NamedSlot>
2
3
4
5
6
7
8
9
# 动态组件
1、基本使用
<template>
    <div class="container">
        <div class="item" v-for"(item, i) in newList" :key="item.id">
             <component :is="item.componentName" :data="item">
        </div>
    </div>
</template>
<script>
import componentVideo from './componentVideo';
import componentText from './componentText';
export default {
    components: {
        componentVideo,
        componentText
    }
    data() {
        return {
            newList: [
                {
                    id: 1,
                    content: '视频组件',
                    cimponentName: 'componentText'
                },
                {
                    id: 2,
                    content: '内容组件'
                    cimponentName: 'componentText'
                }
            ]
        }
    }
}
</script>
2
3
4
5
6
7
8
9
10
11
12
13
14
15
16
17
18
19
20
21
22
23
24
25
26
27
28
29
30
31
32
33
动态组件出现在根据数据动态显示不同的组件,如(新闻 APP)
# 异步组件
1、基本使用
<template>
  <div class="container">
    <componentText v-if="showcomponent" />
    <button @click="showcomponent = true">展示组件</button>
  </div>
</template>
<script>
export default {
  components: {
    componentText: () => import("./componentText/index"),
  },
  data() {
    return {
      showcomponent: false,
    };
  },
};
</script>
2
3
4
5
6
7
8
9
10
11
12
13
14
15
16
17
18
# 缓存组件
1、基本使用
<template>
  <div>
    <button @click="changeState('A')">A</button>
    <button @click="changeState('B')">B</button>
    <button @click="changeState('C')">C</button>

    <keep-alive>
      <KeepAliveStageA v-if="state === 'A'" />
      <KeepAliveStageB v-if="state === 'B'" />
      <KeepAliveStageC v-if="state === 'C'" />
    </keep-alive>
  </div>
</template>

<script>
import KeepAliveStageA from "./KeepAliveStateA";
import KeepAliveStageB from "./KeepAliveStateB";
import KeepAliveStageC from "./KeepAliveStateC";

export default {
  components: {
    KeepAliveStageA,
    KeepAliveStageB,
    KeepAliveStageC,
  },
  data() {
    return {
      state: "A",
    };
  },
  methods: {
    changeState(state) {
      this.state = state;
    },
  },
};
</script>
2
3
4
5
6
7
8
9
10
11
12
13
14
15
16
17
18
19
20
21
22
23
24
25
26
27
28
29
30
31
32
33
34
35
36
37
<!-- KeepAliveStageA -->
<template>
  <p>state A</p>
</template>

<script>
export default {
  mounted() {
    console.log("A mounted");
  },
  destroyed() {
    console.log("A destroyed");
  },
};
</script>
2
3
4
5
6
7
8
9
10
11
12
13
14
15
在切换过程中:会触发 deactivated 和 activated 生命周期函数。在没有使用 keep-alive 时,切换过程会触发 destroyed
keep-alive 参数
- include - 字符串或正则表达式。只有名称匹配的组件会被缓存。
- exclude - 字符串或正则表达式。任何名称匹配的组件都不会被缓存。
- max - 数字。最多可以缓存多少组件实例。
# mixin
1、基本使用
<template>
  <div>
    <p>{{ name }} {{ major }} {{ city }}</p>
    <button @click="showName">显示姓名</button>
  </div>
</template>

<script>
import myMixin from "./mixin";

export default {
  mixins: [myMixin], // 可以添加多个,会自动合并起来
  data() {
    return {
      name: "浩浩",
      major: "web",
    };
  },
  methods: {},
  mounted() {
    console.log("component mounted", this.name);
  },
};
</script>
2
3
4
5
6
7
8
9
10
11
12
13
14
15
16
17
18
19
20
21
22
23
24
// ./mixin
export default {
  data() {
    return {
      city: "北京",
    };
  },
  methods: {
    showName() {
      console.log(this.name);
    },
  },
  mounted() {
    console.log("mixin mounted", this.name);
  },
};
2
3
4
5
6
7
8
9
10
11
12
13
14
15
16
把组件中共有的逻辑抽离出来到 mixxin 中,使用时将其引入即可,会于当前组件的变量,方法进行覆盖或合并,钩子函数则进行合并。
缺点:
- 变量来源不明确,不利于阅读
- 多个 mixin 可能会造成冲突
- mixin 和组件可能出现多对多的关系,复杂度较高